Magiczocker (discussão | contribs) m (Desfeita a edição 82856 de 189.41.237.88 (Discussão)) Etiqueta: Desfazer |
(cleanup) Etiqueta: Desfazer |
||
| (8 revisões intermediárias por 7 usuários não estão sendo mostradas) | |||
| Linha 250: | Linha 250: | ||
==== Quarry Mining ==== |
==== Quarry Mining ==== |
||
| − | {{ |
+ | {{Principal|Tutorials/Quarry}} |
[[Ficheiro:2011-07-15 00.54.14.png|100x|thumb|left| A 16x16 Quarry being looked at from the top]] |
[[Ficheiro:2011-07-15 00.54.14.png|100x|thumb|left| A 16x16 Quarry being looked at from the top]] |
||
| Linha 564: | Linha 564: | ||
===Worst Case Scenario=== |
===Worst Case Scenario=== |
||
| − | If you fall into [[Lava]], do not panic; try to get far away from the lava. This way even if you die, your stuff won't be destroyed by the lava. <s>Eat food in order to buy yourself enough time</s> (this was changed in [[Version history#B1.8|Beta 1.8]]. If you need to heal, eat [[Food]] and hide in a corner/away from [[Mobs]]), and make sure you use a [[Water Bucket|bucket of water]] if you have one. If you know you are going to die anyway press {{ |
+ | If you fall into [[Lava]], do not panic; try to get far away from the lava. This way even if you die, your stuff won't be destroyed by the lava. <s>Eat food in order to buy yourself enough time</s> (this was changed in [[Version history#B1.8|Beta 1.8]]. If you need to heal, eat [[Food]] and hide in a corner/away from [[Mobs]]), and make sure you use a [[Water Bucket|bucket of water]] if you have one. If you know you are going to die anyway press {{Teclas|F3}} and {{Teclas|F2}} to find out your coordinates and take a screenshot. |
If you are trapped in blocks and are suffocating, try to dig looking downwards. This could assist you in getting out of the trapped pit. |
If you are trapped in blocks and are suffocating, try to dig looking downwards. This could assist you in getting out of the trapped pit. |
||
| − | If you are fighting and are going to die, press {{ |
+ | If you are fighting and are going to die, press {{Teclas|F3}} then {{Teclas|F2}}. |
Whatever happens, you should look back upon what you did, and analyze how you died, and what you could do to improve. |
Whatever happens, you should look back upon what you did, and analyze how you died, and what you could do to improve. |
||
| Linha 590: | Linha 590: | ||
[[es:Tutoriales/Técnicas de minería]] |
[[es:Tutoriales/Técnicas de minería]] |
||
[[fr:Tutoriels/Techniques de minage]] |
[[fr:Tutoriels/Techniques de minage]] |
||
| + | [[ja:チュートリアル/採掘]] |
||
| + | [[nl:Lessen/Delven]] |
||
[[pl:Poradniki/Techniki wydobywania surowców]] |
[[pl:Poradniki/Techniki wydobywania surowców]] |
||
[[ru:Шахты]] |
[[ru:Шахты]] |
||
Edição atual tal como às 00h37min de 16 de novembro de 2023
No amado mundo de Minecraft, a mineração é a melhor amiga do Jogador. Mas não seja um idiota minerando! Abaixo há dicas fornecidas pela comunidade.
Mineração nas Cavernas
Mais conhecido como "Caça em cavernas". Mineração nas cavernas é simplesmente a prática de explorar cavernas e extrair os minérios encontrados. Os minérios são encontrados no teto, piso e parede das cavernas. Isso é uma afirmação correta depois do update 1.2, quando a quantidade de minérios nas cavernas ou perto delas foi aumentando. Minerar em cavernas tem um alto retorno de investimento, extraindo mais minérios em menos tempo e exigindo menos ferramentas (menos Picareta e Pá Durabilidade é perdida minerando pedra, terra e cascalho) do que em outros casos.
Por outro lado, minerar em cavernas é muito perigoso. Cavernas que ainda não foram exploradas podem conter vários Mobs, uma Espada e um Arco são necessidades práticas. O jogador deve levar uma grande quantidade de Tochas para iluminar cavernas e previnir spawn de Mobs. Cavernas enormes podem ser confusas, então deve prestar muita atenção na navegação, para não se perder facilmente. Mover rapidamente em cavernas torna facil perder passagens apagadas e cair em buracos grandes ou até cair na lava. Praticamente todas as cavernas no nivel 11 ou abaixo são cheias de lava. Por causa disso, os jogadores devem explorar e iluminar uma caverna, e extrair os minérios no caminho de volta pra fora, aumentando o tempo total requerido e reduzir a eficiência de mineração.
O artigo Caverna contém dicas para explorar grande sistemas de caves.
É uma boa ideia carregar um balde de água. Muitas cavernas têm fluxos de lava aleatória, e cavernas abaixo do nivel 10 contém várias pscinas de lava. O balde de água serve como extintor de incêndio. Se você cair na lava, use o balde para a lava virar Obsidiana, em cima da lava, em uma superfície sólida como pedra ou do lado da lava.
Itens Recomendados para trazer Quando está minerando em cavernas
1.Picareta. Se for sua primeira viagem, minere Pedra Rachada e faça uma Picareta de Pedra. Caso seja experiente, leve pelo menos duas Picaretas de Ferro e uma Picareta de Diamante
2.Tochas. Um pacote (64) é recomendado. Iluminar a área ao seu redor te ajuda a encontrar minérios escondidos e não nascerem Mobs
3.Carvão, Madeira e Gravetos. Se as suas Tochas ou Ferramentas acabarem, você pode fazer mais Tochas ou uma Mesa de Trabalho para criar mais Ferramentas e te salvar caso sua Picareta acabe. Por razões de segunraça, crie um Baú e guarde coisas importantes, como minérios.
4.Balde de água. Apenas para esfriar a lava e criar passagens sem cair na lava ou criar Obsidiana
5.Balde vazio. Usado para recolher lava e usar como combustível na fornalha, emborá seja recomendado caso tenha uma quantidade grande de objetos/minérios para fundir. O balde de leva fundi 100 objetos/minérios.
6.Pá. Ter pelo menos uma Pá de ferro ou duas Pá de Pedra para se livrar de cascalho ou dirt rapidamente.
7.Espada. Ter pelo menos uma Espada de ferro ou uma Espada de pedra para se defender de mobs
8.Arco. Para poder matar Mobs a uma longa distância.
9.Flecha. O Arco é inútil sem Flechas. Ela é a munição do Arco. É recomendado ter pelo menos 32 Flechas. Pode coletá-las através de esqueletos, que dropam uma pequena quantidade ou simplesmente fazer.
10.Comida. Visitas prolongadas em cavernas te deixará com fome. Trazer comida deixará a barra de fome cheia, podendo recuperar danos.
11.Opcional Tochas de Redstone. Para fazer rotas, caminhos.
12.Lobos. De preferência 5. Se a caverna for grande, e não deixá-los sentados, e você for atacado, eles te ajudaram a defender. Útil para spawners, dungeons, enquanto o lobo ataca os Mobs, você ilumina e pega as coisas dos Baús
Dica final: Usar Armadura de qualquer espécie para se proteger mais.
Drifting
Cavernas, muitas vezes, contém becos sem saídas. Muitos dos becos tem um parede fina que, quando removida, revela outras passagens, que podem ser conexões para outro sistema de caverna. Drifting é simplismente procurar cavernas cavando para além dos aparentes "becos sem saída".Note que isto aumenta o risco de você se perder. Porém, você pode se orientar colocando as tochas de uma maneira, sempre no lado direito ou no chão, explorando cada vez mais, para voltar depois, é só seguir as tochas que estão no lado esquerdo. Você pode usar outra maneira para saber de onde você veio, só colocar uma tocha de redstone no lugar em que você entrar na caverna.
Drifting é bom para acharDungeons onde os sons de mobs são altos nos buracos sem saída.
Nota: A partir da versão 1.8, becos sem saída foram removidos, porém ainda podem ser encontrados.
Mineração em Minas Abandonadas
Isso é semelhante com a mineração em cavernas, porém é feita na Mina Abandonada e os recursos são abundantes. Isto dá um grande retorno nos investimentos.
Comparado a mineração em cavernas, a dificuldade é você se perder facilmente nos túneis da mina, e tem tochas pré-colocadas, fazendo com que seja difícil saber se você já explorou nesse lugar. Além de que minas abandonadas contém cave spider spawners que são difíceis de achar e destruir.
Porém tem um lado positivo, onde tem tochas pré-colocadas, as chances e nascer mobs hostis são pequenas. E ofs túneis são feitos de Pranchas de Madeira, fazendo com que a falta de madeira, obrigando a ir para a superfície, diminua. Além disso, minas abandonadas contém vários trilhos e baús de tesouros cheio de itens.
Minerar Eixos
Mais conhecido como Minerar na vertical e Eixando
Métodos
Escadas
Minerar usando escadas é uma técnica comum para chegar rapidamente aos niveis mais baixos do mapa, recolhendo muitas PedrasEla consiste essencialmente de baixo de mineração de tal maneira que o jogador sempre pode subir de volta para a entrada da mina. A vantagem de não precisar criar ladeiras ou de outros meios para voltar a superfície.
Mineração com TNT
A mineração com TNT é semelhante ao método tradicional de cavar até a bedrock, exeto pelo fato de que, quando você chegar a bedrock, você preenche o buraco com TNT e dessa forma, quando você acender a TNT, irá se formar um buraco da bedrock até a superfície. A atual prática disso é questionável, já que o mineiro está cavando pra baixo, no entanto, ele pode estar interessado em coletar os recursos, estaria acompanhado de um túnel que leva ao fundo, para o mineiro pegar os minérios jogados.
Direto
A estratégia mais básica é a de minerar em uma linha reta em um ângulo de 45° pra baixo, movendo-se através de um bloco para cada bloco para baixo. Para melhor movimentação ao escalar de volta, cave 4 blocos acima de cada passo, em vez de 3. Dessa forma você não baterá a cabeça em cada salto. Outra estratégia boa é colocar uma tocha de 10 em 10 blocos, dessa forma você pode saber a sua elevação e quando é provável encontrar lava. Para subir de volta , você só precisa segurar a tecla saltar enquanto se move para a frente.
Depois de coletar Pedra ou Madeira, você pode fazer Escadas e colocá-las em seu tunel. Isso fará com que a viagem muito mais suave, mais fácil e rápida sem a necessidade de saltar. Embora um bloco extra do teto da escada deverão ser removidos para colocar as escadas.
Alternativamente, você pode cavar na diagonal. Enfrente um canto, e imagine que o bloco é o bloco de canto em falta de um cubo 2x2x2. Agora cave esse cubo. Repita, acrescentando tochas a cada passo. Essa forma consegue mais recursos ao mesmo tempo. Esse método é muito útil para coletar Pedras. Como essas estratégias são simples e não muito demoradas, você será capaz de chegar até a Bedrock rapidamente. Quando você bate bedrock, você deve subir 3 blocos e começar a cavar 2 blocos de altura para uma direção. Essa é uma forma eficaz para obter os diamantes e todos os outros minérios.
Espiral
Escadas em espiral são um pouco mais complicadas porque tem mais curvas, mas tem a vantagem de levar para baixo e de dar uma escavação mais direcionada. Um design é a grade 3x3 na horinzontal. Cavando um bloco para baixo, e movendo em torno do perimetro da área 3x3. Você pode, opcionalmente, deixar a coluna do meio ou substituí-la por escadas, mas é necessário para o funcionamento do espiral. Você também pode colocar bloco de escadas. Adicionalmente, você pode remover a coluna central quando você terminar, e colocar água no topo, fazendo você subir ou descer mais rápido. Mas fique de olho no medidor de ar (fôlego), e deixar um buraco a mais no chão para a mesma não derramar por tudo.
Espiral (2x2)
- Fique sobre o bloco inferior esquerdo da sua escada. Cave um bloco pra baixo, então você tem que pular um bloco para sair de sua escada.
- Mine os blocos na frente de você e o bloco de baixo da sua frente. Vá para frente e caia nesse buraco.
- Vire 90°. Coloque tochas quando ficar muito escuro.
- Repita os passos 2 e 3 até o objetivo for alcançado.
Eixo de mineração
Eixos são extraídos de túneis verticais utilizados para obter acesso a lugares de mineração subterrâneos. Eles podem ser de qualquer largura a partir de blocos de 1 x 1.
1x2
- Pick a place where you want your shaft
- Mine a first block adjacent to the block you are standing at
- Step down
- Mine a block you were standing at and one below it
- Place a ladder every block (from the 1.5 update, you cannot go up ladders with gaps)
- Go to 2.1
- Continue in above pattern until you reach desired depth. From then on use a horizontal mining method of your choice
Mining in 1x1 shafts can be extremely dangerous. The safest vertical shaft is a 2x2, as it allows more of a view for safety and allows you to place torches opposite the ladders to light the shaft up.
3-in explosions
3-in explosion mining is the preferred method of using TNT to mine. You find a solid stone wall, mine 3 blocks inward, and then you place 1 block of TNT on the 3rd hollowed out space. Once placed, with flint and steel in hand, you LEFT-click it with the flint and steel and back up a few steps and QUICKLY block off the front of the hole with one block of stone. The explosion should create a perfect 4x3x3 hole. Repeat as desired.
A much faster (but risky) technique is mining in a small alcove, filling it with multiple units of TNT, and igniting it, creating a fairly large cavern.While this variation uncovers a large number of blocks at once, the explosions destroy most of the blocks, potentially including valuable ores, and the explosion can let a large amount of lava to leak in, making the cave hard to access and burning any blocks spared by the explosion.
Water-Drop Shaft
With a separate ascent shaft, getting to the bottom can be extremely fast; you simply fall into a water pit. Ascent is accomplished with a ladder. This arrangement can be accomplished by first stockpiling about 64 ladders along with 2 water-filled buckets, and then excavating a 3-block wide shaft. One side of the shaft becomes the water pit, while ladders are placed in the other side. The middle is then filled in to prevent falling outside the water pit while descending.
For detailed building instructions, see Vertical Mine Shaft With Water Drop.
UrsaArcadeus's Strategy
For those who are a fan of vertical mining, you can use this technique to maximize the area covered, while minimizing the cobblestone produced. This technique combines the ore coverage of strip mining with the cobblestone output of vertical shaft mining. First, find or make a flat plain. Dig a series of 2x1x1 pits in the following pattern:
Stand in each pit so that, if one block was to be mined, you'd still be standing on the other. Position the crosshairs so that, when one block is mined, you start mining the other block on that level in the pit. Once you reach the bottom of the map, used the collected cobblestone to make a column below you, so that you go back to the top of the shaft. Then seal the remaining hole with cobblestone. The pattern may be tesselated as needed to fill the area you are mining in. The top two by one cobblestone cap may be replaced with a material found on the surface, as to cover the evidence of a shaft. However, only do so once completely finished mining in that area, or you risk falling into your own pit.
Horizontal Mining (or Resource Mining/Stratifying)
Safety
Horizontal mining is not as dangerous as vertical. But there are some similar suggestions. Carry a water bucket and some blocks of some disposable, NON FLAMMABLE material (ex: sand, gravel, cobblestone) somewhere on your hot bar. A block can be used to quickly plug the leakage in cases of lava, and water can be poured over source lava to turn it into obsidian, as well as to put out fire.
Methods
Branch Mining
Branch mining consists of mining out side tunnels from an access shaft to expose as many blocks as possible with a minimum of blocks removed.
Variant 1
An effective technique if you want to find rare resources with minimal effort. It is basically mining down to any level, usually to bedrock, and then mining outwards to the sides, much like a tree with a trunk and branches.
- Use the staircase method to dig down to bedrock.
- Go up 2 blocks and fill any space below you mined out.
- Dig a 3x3 room.
- Dig a straight 2x1 tunnel in a straight line then dig out 20 blocks every 4th block.
- To further increase efficiency, you can end the 20-block tunnel by digging 4 blocks of an 1x1 tunnels as each of the mined block reveals more than a 2x1 tunnel.
This method is based on the relatively low probability of desirable blocks being created without any neighbors, so it will occasionally miss small/narrow ore deposits that fall entirely between the branches, but it covers ground faster, so you'll usually get more ore for your time. If you'd rather be sure of 100% coverage, see the Strip Mining section below.
Diagram:
                           X = Tunnel "Trunk"
                           B = Branch
                           S = Staircase


          B       B                 B       B
          B       B                 B       B
          B       B                 B       B
          B       B                 B       B
          B       B                 B       B
          B       B                 B       B
          B       B       XXX       B       B
X X X X X X X X X X X X X XXX X X X X X X X X X X X X
          B       B       XXX       B       B
          B       B        S        B       B
          B       B        S        B       B
          B       B        S        B       B
          B       B        S        B       B
          B       B        S        B       B


Each branch can be any length, but about 20 blocks long is a good length to begin with.
Variant 2
A similar system to those mentioned
Unlike the first type of branch mining, this uncovers every block down a certain length of tunnel. It involves digging tunnels (usually 20 spaces long) either side of a two-block thick wall.
- Dig a room that is 7 blocks long, 10 blocks wide and 3 blocks high. Have your stairway/ladder in the middle of one of the 10 block walls, preferably 2 spaces wide.
- Starting in one of the corners, dig parallel to one of the walls of the room you just dug, for 20 spaces, placing a torch every 5 blocks.
- Then, dig another 20 block tunnel that has two blocks between it and the previous tunnel.
- Continue until you reach the other side of the room.
Diagram:
Key: A = Air
     B = Stone block
     S = Staircase
     T = Tunnel

                 A A A A A A A A A A T T T T T
                 A A A A A A A A A A B B B B B
                 A A A A A A A A A A B B B B B
                 A A A A A A A A A A T T T T T
                 A A A A A A A A A A B B B B B
                 A A A A A A A A A A B B B B B
                 A A A A A A A A A A T T T T T
                 T B B T S S T B B T
                 T B B T S S T B B T
                 T B B T S S T B B T
                 T B B T S S T B B T
                 T B B T S S T B B T
By utilizing this variant properly you can uncover all the blocks in quite a large area, and the mineral yields are quite high. Having the stairs 2 blocks wide allows for most efficient strip mining as they can be strip mined around. Also, a good length for each tunnel is 20 blocks long.
Advanced Branch Mining
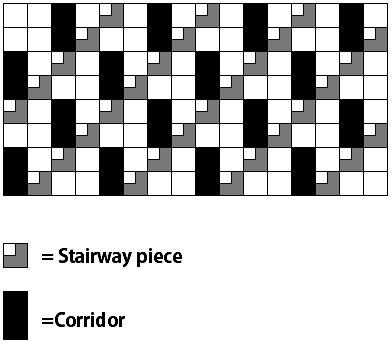
Advanced branch mining is one of the most efficient way to mine 100% of the ores on multiple levels.
This type of branch mining is an extended version of variant 2. By careful placement of corridors, more efficient mining becomes possible. The advanced branch mining lay-out is one such attempt at maximising the amount of visible blocks per block mined.(and in fact the best possible for horizontal corridors) The picture at the right is a side view of this simple tactic.
In most cases, the staircases would not be placed in the same z dimension, as that is inefficient when constructing through caves. Instead place the stairs slightly apart from one another. Two ladders placed vertically between the bottom of one tunnel and the top of another will also allow convenient access, making it a matter of personal choice of what should be used.
To most efficiently use Advanced Branch mining, proceed down a branch until you have used up half of your picks, or your inventory is half full. Then, mine your way to another branch and head backwards.
Simple Strip Mining
My technique is to take off the top 6 layers of a mountain completely. Continue until your mountain is entirely flat. TNT is useful for the first 5 layers, since the explosion will destroy only cobblestone for the most part.
Diagram:
Key: A = Air
     B = Block
     L = Ground Lever
Step 1:
         A A A A A A A A A A
         A A A A A A A A A A A A
       A A A A A A A A A A A A A A
       A A A A A A A A A A A A A A A
       A A A A A A A A A A A A A A A
     B B B B B B B B B B B B B B B B
First 5 layers are gone when you start mining.
Next couple steps are as shown:
         A A A A A A A A A A
         A A A A A A A A A A A A
       A A A A A A A A A A A A A A
       A A A A A A A A A A A A A A A
       A A A A A A A A A A A A A A A
     A A A A A A A A A A A A A A A A
   B B B B B B B B B B B B B B B B B B
         A A A A A A A A A A
         A A A A A A A A A A A A
       A A A A A A A A A A A A A A
       A A A A A A A A A A A A A A A
       A A A A A A A A A A A A A A A
     A A A A A A A A A A A A A A A A
   A A A A A A A A A A A A A A A A A A
 B B B B B B B B B B B B B B B B B B B B B
This time consuming method is a useful tool for when you need minerals or a flat area.
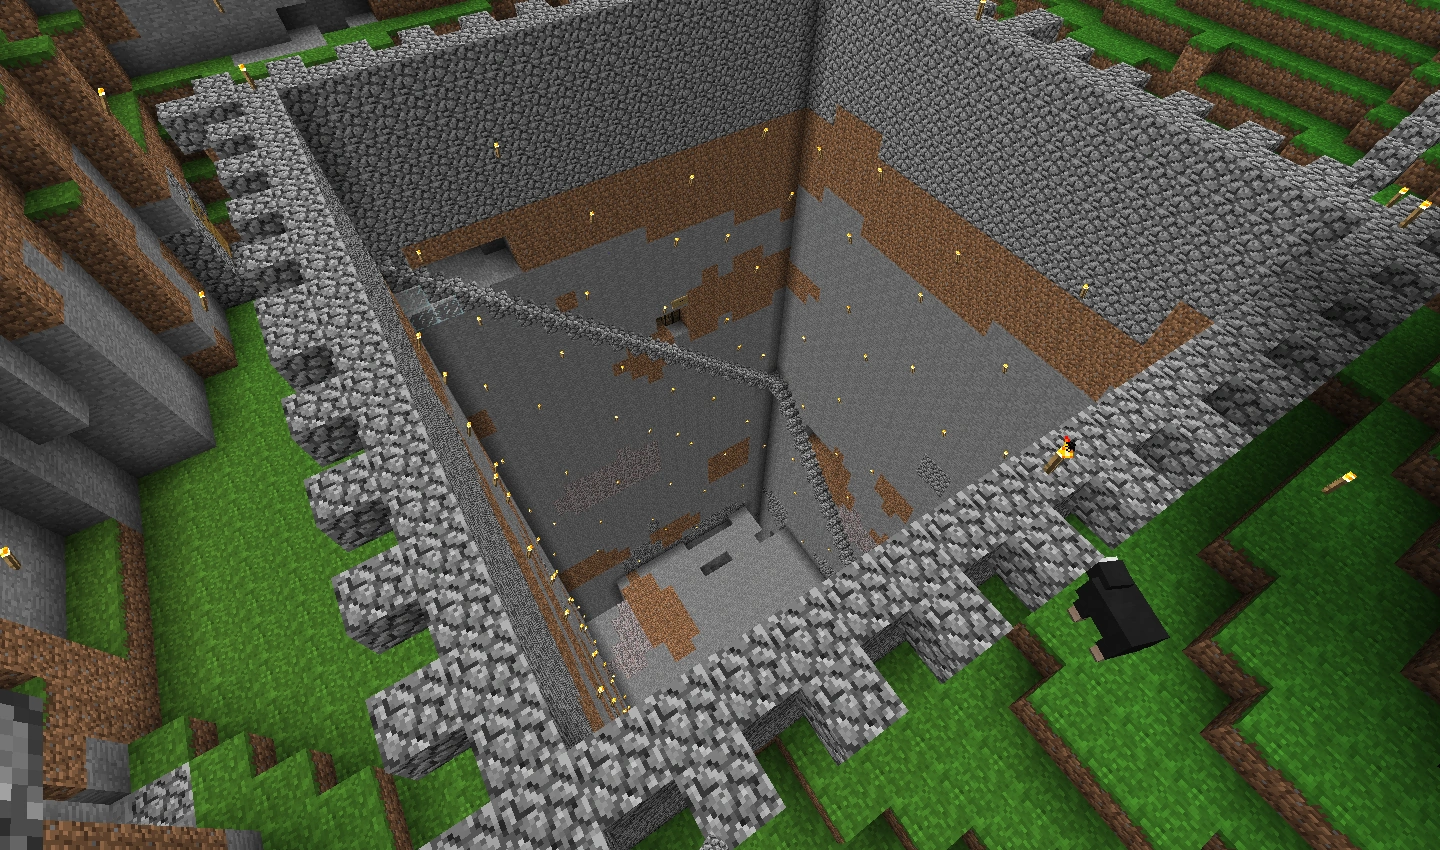
Quarry Mining
A 16x16 Quarry being looked at from the top

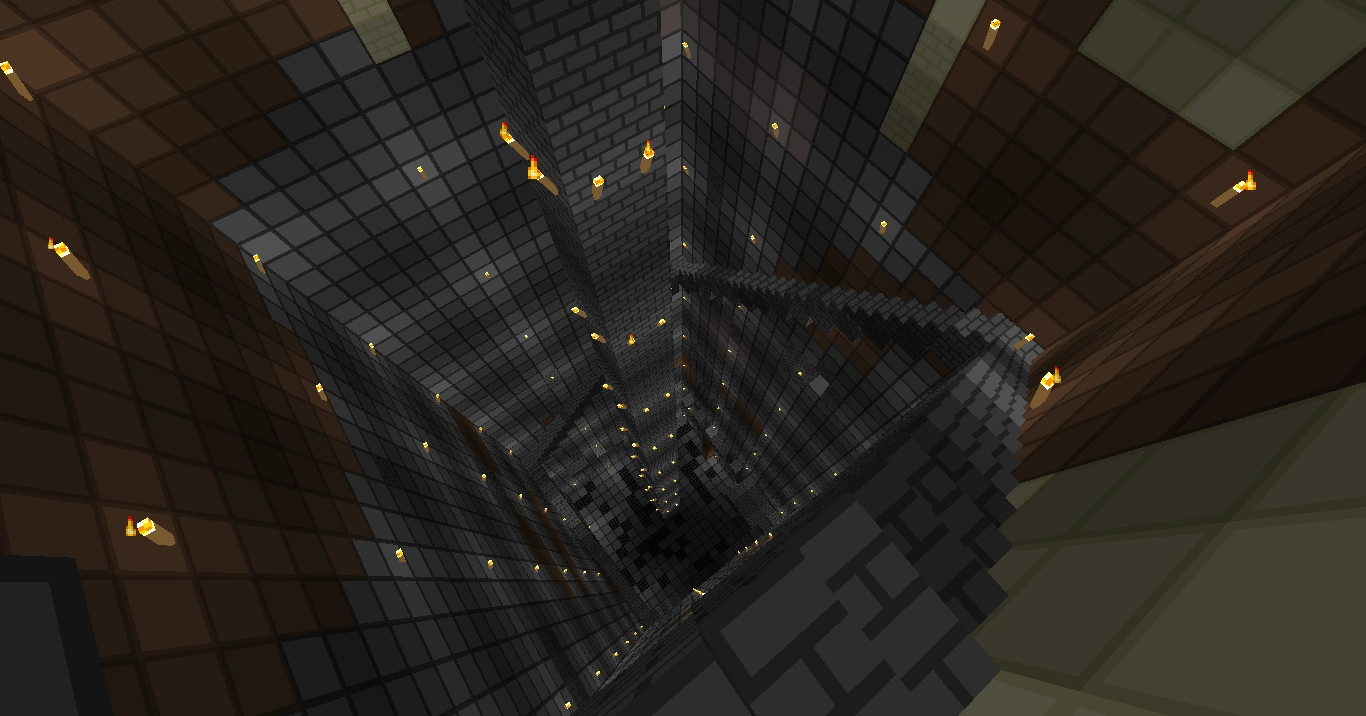
Looking up from the bottom of a Quarry Mine
Quarry Mining is very similar to branch mining, sharing the prospect of taking all resources within an area. The difference between Quarrying and Branch Mining is that the process of Quarrying involves a large rectangular or square strip, continually mined downwards with a staircase running along the side. This method got its name by its similarity to real world quarry sites. Quarries are typically ceased when a large cave is discovered (This does not directly stop the excavation, it just makes it difficult to continue), the miner abandons the Quarry for another project, or the "end of the world" is reached.
An unfinished 20x20 Quarry
A 25x25x57 Quarry by Davinskii
The Construction of a Quarry is as follows:
1: Determine the size of the project, there is no standard so simply choose how big you want it to be, however it is advised that the area is large, to maximize resources within a single quarry. (A typical quarry can be 20x20 or 20x30, for example)
2: Begin Mining until the entire area is one block deep, save for one block which will become the stairs
3: Continue mining one block deep while keeping an extra block to extend the stairway, until the mine reaches bedrock or until you wish to abandon the project.
Example:
Key: - = Air
     B = Stone block
     S = Staircase
Top of mine:
         BBBBBBBBBBBBBBBBBBBBBBBBBBBBBBB
         BS----------------------------B
         B-----------------------------B
         B-----------------------------B
         B-----------------------------B
         B-----------------------------B
         B-----------------------------B
         B-----------------------------B
         B-----------------------------B
         B-----------------------------B
         B-----------------------------B
         B-----------------------------B
         BBBBBBBBBBBBBBBBBBBBBBBBBBBBBBB
Next few levels down:
         BBBBBBBBBBBBBBBBBBBBBBBBBBBBBBB
         B-----------------------------B
         BS----------------------------B
         B-----------------------------B
         B-----------------------------B
         B-----------------------------B
         B-----------------------------B
         B-----------------------------B
         B-----------------------------B
         B-----------------------------B
         B-----------------------------B
         B-----------------------------B
         BBBBBBBBBBBBBBBBBBBBBBBBBBBBBBB

         BBBBBBBBBBBBBBBBBBBBBBBBBBBBBBB
         B-----------------------------B
         B-----------------------------B
         BS----------------------------B
         B-----------------------------B
         B-----------------------------B
         B-----------------------------B
         B-----------------------------B
         B-----------------------------B
         B-----------------------------B
         B-----------------------------B
         B-----------------------------B
         BBBBBBBBBBBBBBBBBBBBBBBBBBBBBBB
Although the yielded amount of cobblestone, dirt/sand, coal, iron, and to some extent gold, will be enormous, and the possibility of lava is very high, this is not the best method for mining diamond and lapis lazuli, because they're found only at the bottom of the map (Note: Diamonds and Lapis Lazuli CAN be mined using this method, but due to their rarity the placement of the quarry along with its size will determine the amount). This type of mining is suggested for getting large amounts of cobblestone, iron and coal, besides the ability to gain large amounts of resources, this type of mining exposes many caves for further exploration/mining.
Besides mining, Quarries also have some non-resource related benefits, such as keeping the area clean and fresh (not ruining the nature), and a handy trap as the mine is very deep.
Water blocks placed two high at the bottom of a quarry can allow quick descent (by just jumping into the water), and water elevators can be used to quickly return to ground level from the bottom.
Warning: Be extremely careful around this mine, as a fall will surely be fatal.
Tunnel-mining
This involves digging a long tunnel. You will need many logs (for sticks), and optimally, crafting tables, chests, and furnaces. The simplest tunnel is 2 high by 1 wide, but the wider and higher the tunnel, the more cobblestone you get. Dig at about level 50 if under land; 40 if underwater; or 15 if for precious ores. You may want to use the cobblestone to seal off caves already explored. This is like a quarry - but more useful since less resources are spent going through the dirt/sand layer, and it can also be used in conjunction with minecart tracks to go from one base to another. A 4X3 tunnel that is 1800 blocks long will yield as much as an 18X18 quarry to bedrock, though arguably safer as you won't hit the lava layer, and it will yield more diamond/redstone if at layer 15, as well as the fact that falling in is completely non-lethal!
Best used for ores AND cobblestone - for ores only, use Branch mining instead.
Multi-mining
The name fits any combined mine such as the following:
Quarry-Strip Mine
This involves digging a quarry and adding ledges every few blocks down around the outside while digging. The sides of the quarry have to be a certain length, for example with strip mines, you need each side to be [(something divisible by 3) + 1] blocks long, while for branch mines, you need each side to be [(something divisible by 4) + 1] blocks long. The result will vaguely resemble a shopping mall atrium with one massive open space and then a bunch of "shelves". Then, dig the shafts to at least 20 blocks for a ton of ores, including quite a few diamonds (about 3 veins) down on the lower levels. For a 10x10 quarry, you will get about 150 stacks of cobblestone, while for larger mines (e.g. 40x40) you will get around 2000 stacks, handy for massive building projects.
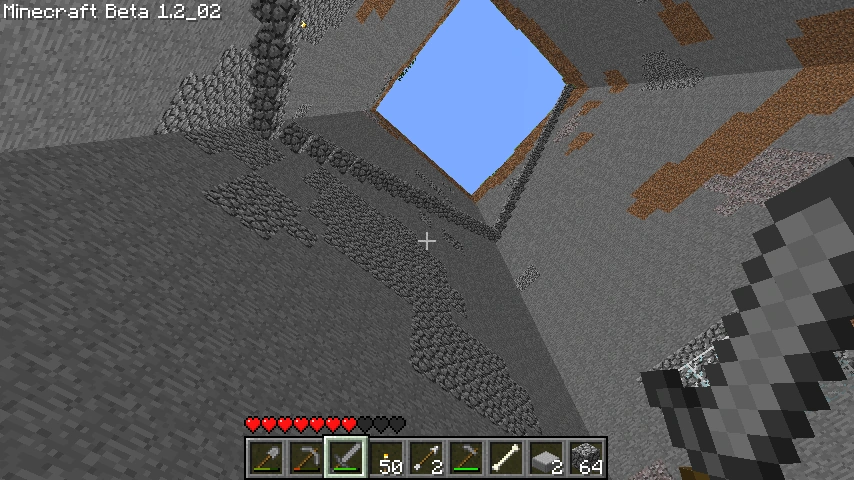
Quarry-Cave Mining
Dig a quarry down to under Y-level 25, and attempt to unearth a cave. If you do, you can explore that cave. Many of the deeper caves have no surface entrance, and being able to expose a cave that is otherwise sealed to the outside world through a quarry can garner you both large amounts of cobblestone, dirt, and gravel, as well as the rewards of mining out a deep cave. If you don't want to hold on to the stone that is excavated, you can use it to fill in dead ends, allowing you to navigate the remainder of the cave more easily.
Cosmetic Mines
This section is for mines that are not cramped midget tunnels and focus more on aesthetics rather than efficiency.
Clc's Vertical design
A mine of mine (No pun intended) I decided to talk about, seeing as how few aesthetic mine designs there are it should be a welcome change. Mind you don't expect to do all the connections, let alone open/maze connections (Variations section) unless you're on a server, or you have a will you can break diamond on.
Design
This design consists of a Hub and a Push leading into another Hub.
Key:
   B - Block

   _ - Air
Hub:
Top view:
         BBBBBBB

         BB___BB

         B_____B

         B_____B

         B_____B

         BB___BB

         BBBBBBB
Side view:
         BBBBBBB

         BB___BB

         BB___BB

         B_____B

         B_____B

         B_____B

         BBBBBBB
Each push is basically the design behind it (The side view) dropped a square repeated several times, the amount is dependent on the miner but an even number is preferred due to torch placement (Discussed later)
The central hub (The first hub made in the mine) will have 4 pushes in each of the cardinal directions, eventually, if you are in need of ores you may choose to go down in one direction until you have what you need. I recommend you check your y coordinate about now, you may want a push length that will allow you to get your y value as close as you can to 12 (Lava spawns in caves at 10, and your y is up 2 for the positioning of your head) After you've decided on your length and finished a push you make another Hub in the same size as above. Continue until you reach the last of your hubs (You should end it before you hit bedrock, otherwise it won't be very nice looking)
Torch Placement
Torch placement is simple in this design. You will have 8 torches in each hub, on both sides of the bottom of the corners. If you want you may add a torch to the center floor to add more light, but it is enough to prevent mobs spawning as it is now.
For every push you put two torches on every other left and right hangs.
Connections
After you finished all of the cardinal pushes you'll be wondering what next to do, considering the amount you've mined you may want a place to store away items, connections are great for this.
Each connection is a hub formed by two of the cardinal branches intersecting, meaning if you went to the first north hub down, you'd have to mine one push/hub to the left and connect to it from the first west hub down by pushing right. It's the same as the hub but it leaves two walls with nothing to do, if you try to continue with them you will get intersections that are hard to make aesthetic unless your looking for a large open mine, or a maze mine. Instead, you can use it for chests, and it works well for it's purpose. Very hard to describe with letters, so here's a picture instead: Picture
Continuations
After your cardinal directions are done, you have your as many connections as you care for, what's next? You continue Adding onto your bottom hubs, only with straight pushes. The bottom hubs will branch in all directions except backwards (Unless your going with a open/mine variation) and each of those hubs may spread in the same direction so long as it's not backwards for the original hub. If you positioned well in the first central hub and push size, you'll be scraping a long in a fairly wide tunnel along the same height you find diamonds. It's easy sailing from here on.
Varations
Central Drop shaft:
Central hub is under an area of flat ground, you put a three deep hole where torches will go, ladders go on the bottom and top, torches in the middle, you go above the hub as normal only there will be a 2 high gap under the hangs on this first hub to allow for the ladders as a way up. Due to update you will need the ladders to go all the way down, and such won't have a place for a torch. You can circumvent this by putting them on the middle of part left over at the top of the next section, the lighting is the same and you won't need an extra torch to prevent mobs spawning. This also works particularly well if you want to replace the top with glass.
Open Mine Connections:
Same as original, only every connection you make splits off in all four directions. It goes up with a 1 wide path in the center in all four directions and the both of the two wide paths go down until they merge (Which is when it can do so without getting rid of the upward path
There are two variations, one where you will go up when you make a connection, so you will have a stack of hubs in all directions, another where you only dig down in the connections, where they intersect you build the 1 central path down to the hub. The latter is more efficient as all of it will eventually lead to the bottom and therefore be mining ore.
Maze Mine Connections:
The same as an Open Mine except your down path is one wide, not your up path. Same two variations, same correlation in efficiency.
Lava lights:
You can replace the torches in the center (If you placed them at all) of the hubs with a piece of glass and lava under it and it gives only one light less. You can change it for a 3x3 if you feel so inclined and have enough lava.
Drop Shafts:
This combines the Central Drop Shaft and optionally the Open and Maze Mine Connections. It requires close tallies if you don't want to combine them though.
At your Hub you mine down the same as if you were going to make a Central drop Shaft, but continue until you are on the same level as your next hub (Depends on the size of your push, like a 8 push would be 8 blocks down) After you reach the bottom you make another hub in the same style as a Central Drop Shaft. This will require more ladders, so it's not a very good idea if your short on wood, but it allows a certain maze quality that I find welcome.
There are two places where you can put the ladders, but the two per corner type of the Central Drop Shaft style is preferred, however the other style uses less ladders. You mine your shafts in the blocks directly north/south/east/west of the center so that you have 4 shafts all the way to the next hub, this require 5 blocks to hang down from the hub, some like it, others don't.
Two variations on top of that, you may use the drop shaft for all your hubs, thus any hub with a hub above will be able to ascend, or you can only use the shafts for the central hub, adding 'terraces' to your mine.
Where does open/maze mine connections come in? After you get down to the bottom level you may continue to stretch out and connect with the original push/hubs. Once you connect you may use the open style, leaving 1 wide path up or the maze, leaving 2x2 wide up.
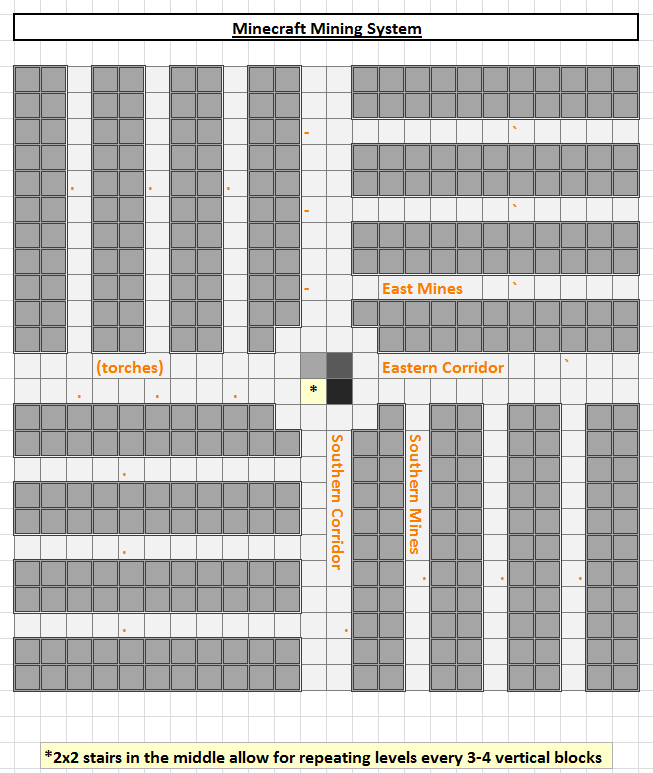
Other Aesthetic Mine Ideas
Central Mine
- is open space;
- are rails
Once every x blocks you should change the rail/torch/rail combination for a Powered Rail/Redstone torch/Powered Rail
You will have a central rail system with smaller hallways for pedestrian traffic. On interesting locations, you should add some kind of rail station with access to the rail.
Side Mines
Connections
(From the top)
Random Mining
Quite possible the simplest, and potentially rewarding and dangerous form of mining in all of Minecraft. It is making any amount of holes or indents anywhere at any size or depth. It can be the most rewarding as one may find dungeons or rare materials in the process. However, at the same time, one may accidentally dig their way into a pit of lava (causing the player to burn and lose all their items), falling into a deep cavern (causing enough fall damage to kill the player), or underneath sand or gravel (causing suffocation), etc. It is the simplest form of mining as it follows no specific pattern and may also lead to the creation of any form of mining mentioned above or below. This method is useful for the creation of hard-to-find/secret places as one may think that the area of the mine has no specific purpose and/or was just a mediocre attempt to gather materials.
Note: In order to preserve safety it is recommended to never dig directly below oneself, or directly above.
Space/Portion Mining
Not to be confused with Strip Mining; however, this does involve a similar method.
Room Mining
This form of mining involves someone to make a hall way and then make a small opening in the wall. From there, one must simply dig out a portion of the block to create a space. This method is repeated many times down the hall on either side to create rooms for various purposes, while finding several ores and valued materials in the process. This method is useful for the creation of houses, barns, indoor-gardens, storages, and in the creation of hard-to-find/secret places as it offers a variety of places one may go to in order to find something, but they may likely give up in the process unless they are determined.
Tunnel Mining
This is highly similar to Room Mining, except that instead of Building rooms, you build tunnels. However, this takes much longer to do and tunnels are usually much larger than rooms. Because of this, Tunnel Mining is lesser to be used as the tunnels take up many tools in the process of making them as well as the mining process may dig into a body of water and flood the tunnel. However, if the player wants to make an artificial river for boats, this may not be a problem. Despite the fact that they may yield many resources, players may use up several pick axes or shovels in the process of making them as well as torches to light up the tunnel. Players may get bored of doing this and may abandon the tunnels while still in the process of making them. Some may not consider beginning construction on future tunnels due to lost supplies and the tunnel not being rewarding enough to continue. This method is useful for making minecart subways, large indoor-gardens, art galleries, tree farms, boat rivers, large barn(s), mazes, doing construction on vertical and horizontal structures, constructing strip mines, and secret/hard-to-find areas by making tunnels that seem to go nowhere.
Clear Mining/Safe Mining
The general purpose of Clear Mining (or Safe Mining, whichever one may prefer to call it) is a variation of Box Mining and other simple techniques. A player first finds a suitable area, preferably one block above the bedrock layer so that the player can easily obtain diamonds and other rare minerals. The player must also have at least 5 to 6 stone picks, one iron pick for rare minerals such as gold, and 3-4 shovels for gravel. A sword is optional depending on the players preferred difficulty settings. Once the player has found a suitable and deep area that they are confident in they may either begin or set up a small chamber near the area to store minerals and construct tools to further their mining. To begin, make a simple 1 block long and 2 blocks high that spans roughly 8-10 blocks in length. Once this has begun, the player then uses their stone picks to mine directly in front of them where their tunnel ends, but, there is a catch. The player does not move once they make their initial 8-10 block tunnel, and mines only the above block of the two block height making a small box, 4 blocks long. Once the player makes a half tunnel 4 blocks long, the turn to their left or right and do the same; not breaking any of the blocks below the first block. (when done the concept is much more simple) After the player makes a reversed "T" shape, then the player can start to mine out the remaining areas around the tunnels, only using their reach length to clear away stone and any materials. Once the player has maxed out their reach length, they will be in small "box" that reduces risks of being suffocated by gravel or possibly lava. The player then should have a clear area, and then mines out the remaining second blocks, still avoiding the "edges" of the safety box. Once all materials are mined, the player can then break the box and gather the resources in one quick run. Once the player is done in this, there will of course be small "edges" that they not reach, and these should be mined out making a clear box. To further the effectiveness of this strategy, one may then place torches in the "frontal" corners of the area and repeat the process on each side, however this time, rotating their view to clear away all areas of their reach, so long as they are away from their initial entrance tunnel. The end result should be a very fast, resourceful, and safer approach to mining at bedrock. However, mobs may spawn in areas of the mine that are poorly lit, and lava is a factor, along with tediousness, so the player must make a commitment to a clear mine, leaving when satisfied with their bounty of materials. Like parenthesized above, this strategy is best played out rather than explained.
General Mining Safety Procedure
Despite the various mining techniques explained here, from the safest to the most dangerous, there are several precautions and techniques that can spell out the difference between a successful day and a horrible nightmare.
Precautions Against Environment
The most devastating and life threatening dangers are often caused by easily avoided environmental causes. Most notably lava floods and cavern falls. Remember these rules and you can improve your life expectancy dramatically -
1. NEVER EVER EVER DIG DOWN !!!!!!!!!!!!!!!!!!!!!!!!!!!!!!!!!!!!!!!!!!!!!!!!!!!!!!!!!!
Digging straight down is the leading cause of death among inexperienced miners, digging straight down can reveal an open shaft, a lava pool or both. Dying from falling damage at the bottom of a deep shaft can result in your belongings being too far from your spawn point to retrieve them in time. Falling into lava will destroy them outright. Therefore, mining 1x1 shafts (digging straight down) is something experienced players never do. If you still want to dig downwards either use the shaft mining technique or employ the "Conmutaz." The Conmutaz was named after the 4 US states Colorado, New Mexico, Utah, and Arizona and the distinctive way they share borders. It comes in two types Conmutaz 2 and 4, Conmutaz 2 is standing on the edges of two adjacent blocks and mining each block column directly down, While the Conmutaz 4 is standing at the corners of 4 adjacent blocks. While using the Conmutaz you can mine directly down while maintaining a high level of safety.
2. Be Prepared For Lava!!
While a bucket or no bucket can mean 64 more blocks of your favorite resource, Not having water is perhaps the worst thing you can do while mining. In the event of a lava flood caused by the unstopping of a lava pocket, the ignorant miner will be at risk of losing their entire inventory. The best way to avoid these crippling losses is to simply carry a water bucket and/or some blocks of material in a quick-slot next to your pick. In the event of a lava flood a block can be used to quickly plug the leakage in cases of water or lava inflow from a side of a shaft, and water can be placed in an advantageous location turning it into cobblestone or obsidian, simultaneously stopping lava flow and quenching flames.
3. NEVER DIG STRAIGHT UP!!!!!!!!!!!!!!!!!!!!!!!!!!!!!!!!!!!
By digging directly upwards you may unexpectedly trigger falling sand, gravel, or, if you're really unlucky, lava or a hostile mob. Standing to one side while mining blocks from the ceiling helps you avoid falling blocks and gives you a chance to react to a sudden lava outpour. If you do want to mine directly upwards, make sure to place ladders on the inside of the shaft, rather than placing blocks below you. The ladders prevent gravel or sand from falling on you and stop potential lava flows from killing you and wiping out your entire inventory. They also provide a quicker escape if you happen upon some mobs (by hitting a cave or a dungeon).
4. Bring Torches and sticks!!
In very dark areas, a pit may not be exposed and may cause a horrible death. Torches are helpful in every way, even on Peaceful difficulty. Be sure to bring sticks, as Coal is abundant in caverns, especially in large ones. Without Torches, Death can occur anytime whilst exploring dark and winding caverns.
5. Bring Wood to make chests
Very useful to new players or to manage your nerves and fears.
Make your chest on the spot and save all precious ores. Place on a man made room. Or just somewhere in a cavern system but you need to memorize very well the place or it will lost. Placing in a crossing corridor point or cubic dead end can help find it.
You can use F3 to know the place but it is considered cheating by some players.
6. Bring a Potion of Fire Resistance just in case
Recently added Potion of Fire Resistance protects you from any form of fire damage and allows you to swim in lava, unharmed. It's useful when you are working near lava or fire - for example, when you are trying to get a resource located over underground river of lava, or you need to dig straight down. Ingredients needed for this potion are quite rare, but it's entirely possible to farm them once you locate their source.
7. Bring a crafting table to make additional tools If your pickaxe breaks you are screwed.Simple as that.
Worst Case Scenario
If you fall into Lava, do not panic; try to get far away from the lava. This way even if you die, your stuff won't be destroyed by the lava. Eat food in order to buy yourself enough time (this was changed in Beta 1.8. If you need to heal, eat Food and hide in a corner/away from Mobs), and make sure you use a bucket of water if you have one. If you know you are going to die anyway press F3 and F2 to find out your coordinates and take a screenshot.
If you are trapped in blocks and are suffocating, try to dig looking downwards. This could assist you in getting out of the trapped pit.
If you are fighting and are going to die, press F3 then F2.
Whatever happens, you should look back upon what you did, and analyze how you died, and what you could do to improve.
If your pickaxe breaks and you've stumbled into a cave and you have lost your way the only option is to punch your way out and this could take a while.
Best Case Scenario
Should you happen to accumulate a large amount of resources, such as, perhaps, 2 stacks of Iron Ore and 10 Diamonds you may be tempted to delve further into the cavern. Resist this urge and return to your base to empty your loot. Dumping off your goodies instead of trying to explore longer may help in the long run, and will reduce the chance of losing your loot.
Amphitheater Mining
Start with a basic U-shaped mine, and make an "amphitheater" down the levels until you have a one-block space. Then, make a doorway ahead to make another amphitheater mine. This is very useful, and you can even make it decorative by adding staircases as stairs or chairs.
| Ajuda | |||||||||||||||||||
|---|---|---|---|---|---|---|---|---|---|---|---|---|---|---|---|---|---|---|---|
| Telas do menu |
| ||||||||||||||||||
| Personalização do jogo | |||||||||||||||||||
| Edições |
| ||||||||||||||||||
| Diversos | |||||||||||||||||||